As an Amazon Associate, we earn from qualifying purchases. Some links on this site are affiliate links at no extra cost to you. Our recommendations are based on thorough research and editorial judgment.
Signs Your Candle Wick Is Too Large (and Why It’s a Problem)
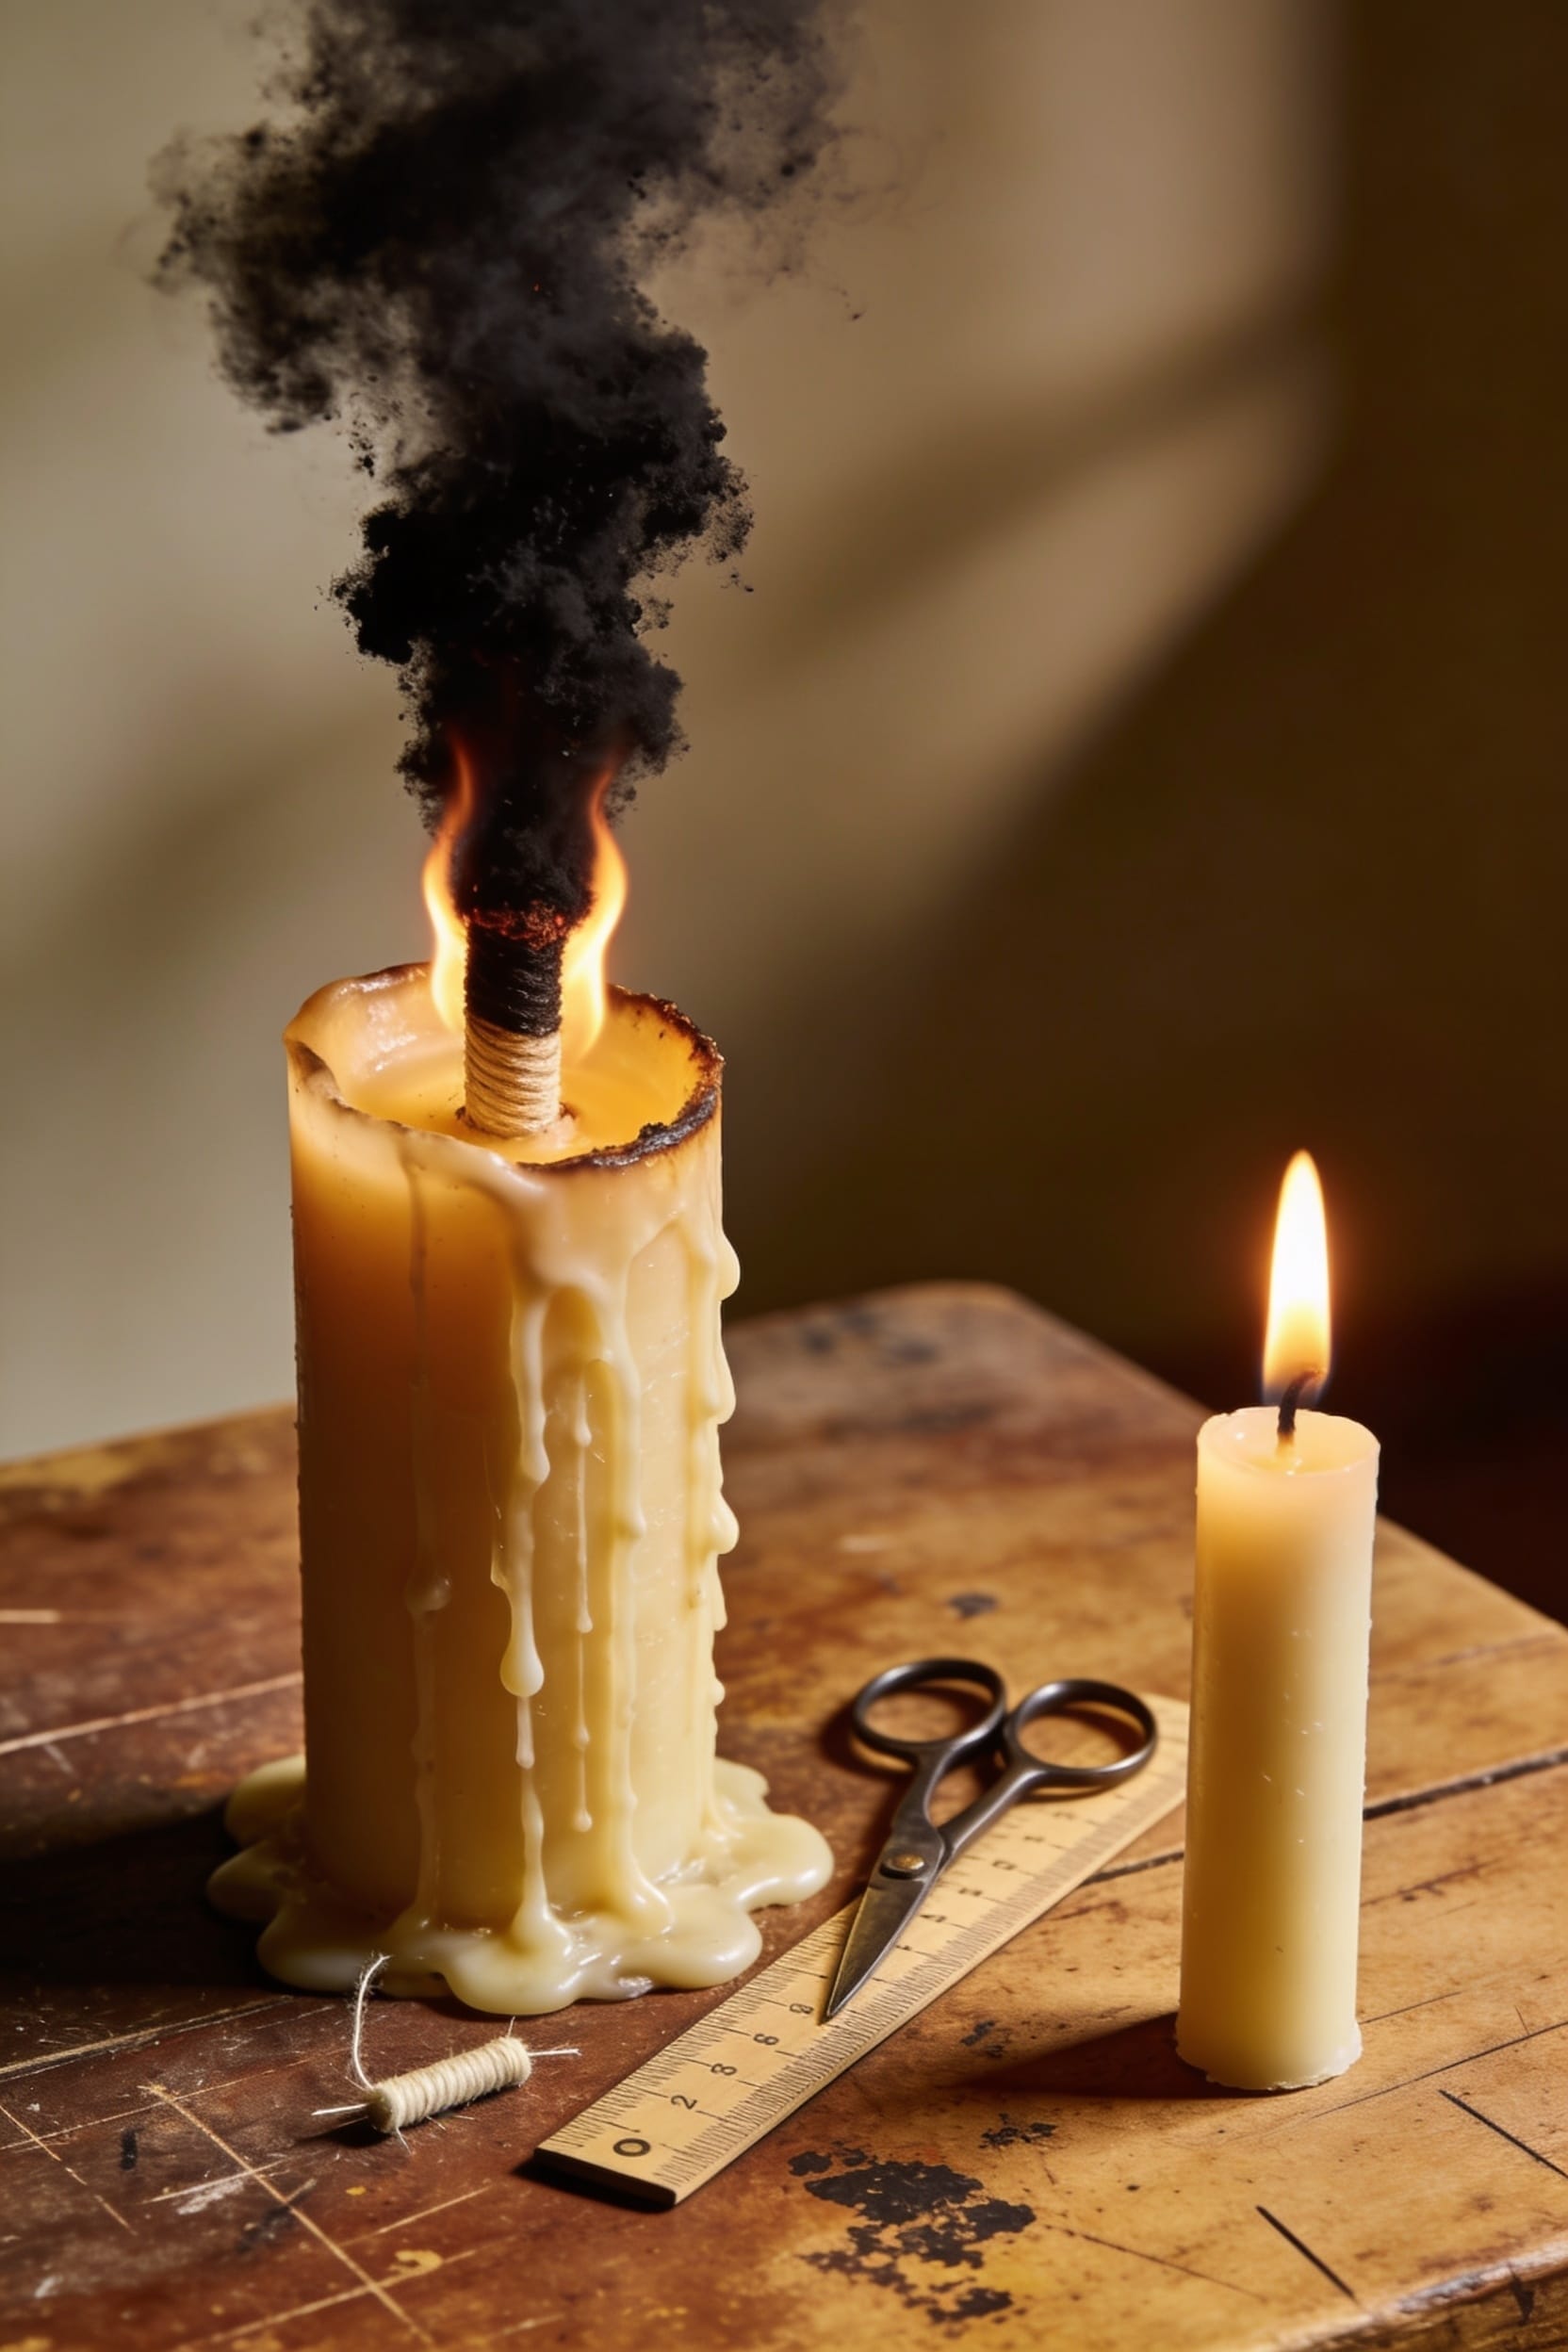
Look, if your flame’s climbing over an inch high, you’ve got an oversized wick on your hands—it’s basically a tiny torch inside your container. The wick burns hotter and faster than your wax can handle, which means excessive heat, black smoke, mushrooming carbon caps, and wasted wax that’ll frustrate your customers before they hit the halfway mark. A proper burn test catches these issues before you ship anything out.
Key Takeaways
- Flame climbs 1–2 inches or more above the wick, indicating combustion instability and improper wick-to-wax pairing.
- Black smoke and soot accumulate, degrading air quality and discoloring ceilings, walls, and nearby furniture surfaces.
- Mushroom-shaped carbon caps form on the wick despite regular trimming, signaling incomplete combustion from oversized wicks.
- Melt pool remains shallow or uneven after 2–3 hours, showing the wick burns faster than wax melts.
- Wax depletes rapidly, shortening candle lifespan and increasing customer frustration with poor cost-per-burn value.
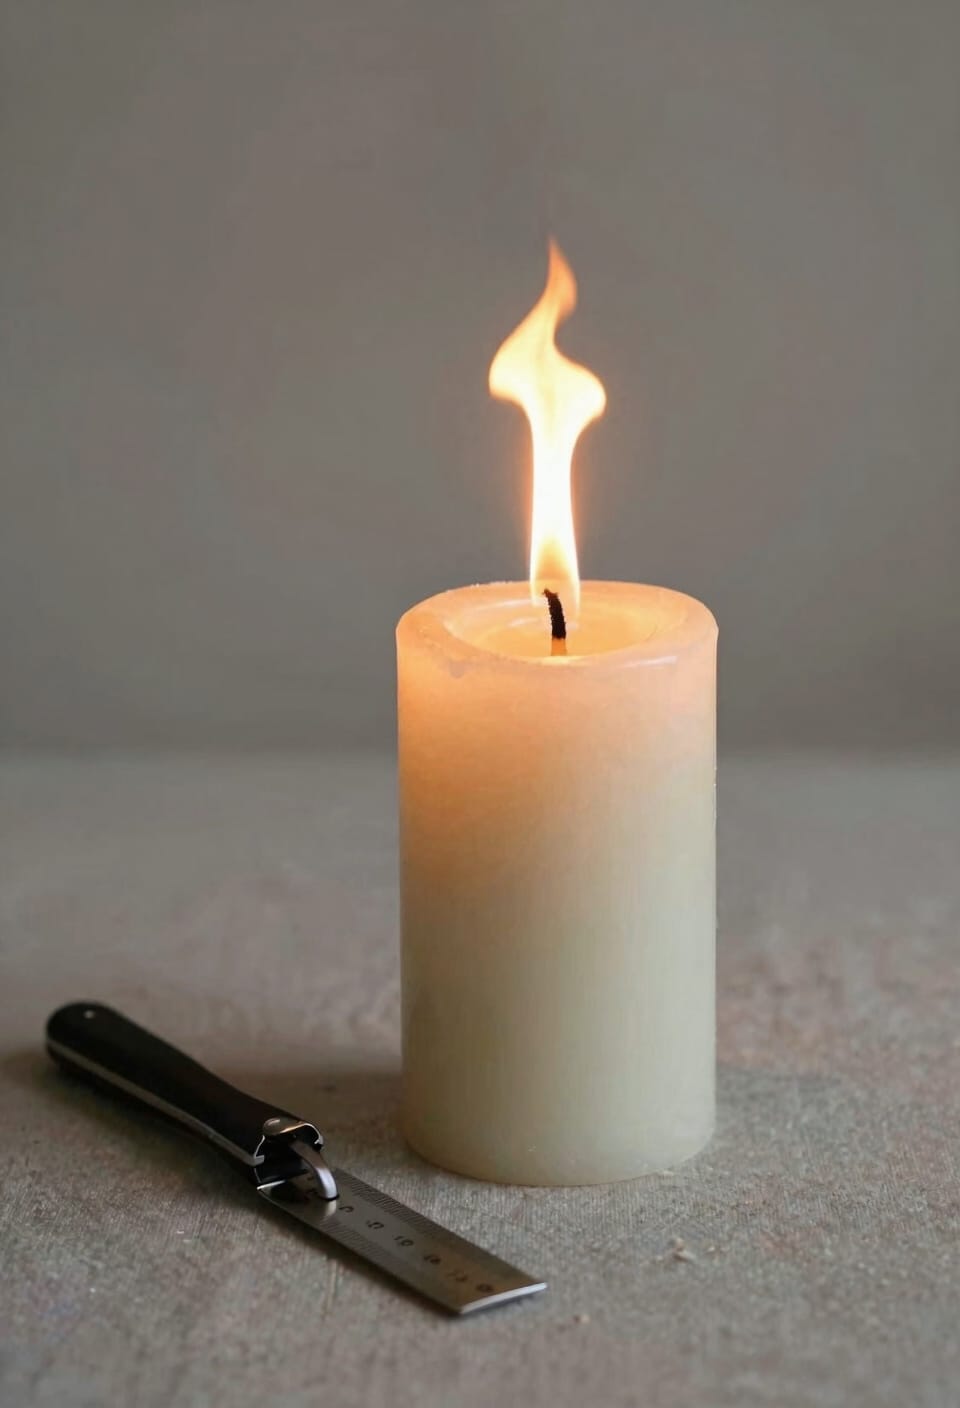
Excessive Flame Height: Your Wick Is Too Big
Noticing your flame climbing higher than it should be is often the first sign that you’ve paired the wrong wick with your candle container. I’m talking flames that tower 1-2 inches or more—way beyond what cotton, hemp, or wooden wicks should produce. All right, here’s what’s happening: a wick that’s too large burns hotter and faster than your wax can handle, creating an uncontrolled flame that looks impressive but spells trouble.
Take flame photography during your burn test—it’s your best diagnostic tool. Compare your results against the wick size manufacturer recommends. If that flame’s dancing around like it’s auditioning for a bonfire, wick trimming alone won’t fix it. You’ll need to downsize your wick entirely. An oversized flame doesn’t just look wrong. It overheats your container, wastes wax, and creates genuine safety risks.
Recommended Products

【EVERYTHING INCLUDED - START TODAY!】Get the FULL candle making experience in one kit! Your kit arrives with 4lb Soy Wax, 6 strong Fragrants, 30pcs Candle Wicks, 7 units candle containers, Wax Melter Pot, & Thermometer. No hidden costs.
✔ ADJUSTABLE FOR ANY CANDLE JAR – Expandable arms fit jar openings from 2-1/2″ to 4-5/8″ wide, making it perfect for single, double, or triple wick candles in nearly any container.
COMES WITH EVERYTHING YOU NEED: This kit includes 3 lbs of Paraffin Wax, 72 inches of cotton wick, 3 candle rubber stoppers, pigment (red, yellow, blue, white), 3 candle molds with base, and a color mixing chart
Why This Matters: Safety Risks of Oversized Wicks
When that oversized flame’s been burning hot and fast for a while, you’re not just watching poor candle performance—you’re sitting with a legitimate fire risk. The excessive heat damages container integrity, potentially cracking glass or weakening walls. That’s a safety issue I’ve learned the hard way.
Here’s the thing: an oversized wick also degrades your indoor air quality. All that soot and smoke? It’s depositing particles into your breathing space. I’ve noticed discoloration on ceilings above poorly-wicked candles—that’s carbon that could’ve stayed out of the air.
Now, heat damage extends beyond the container itself. Nearby surfaces get scorched. Tabletops warp. Furniture gets damaged. The excessive temperature rise means you’re effectively running an uncontrolled burn, and that’s not acceptable for something meant to safely illuminate your home.
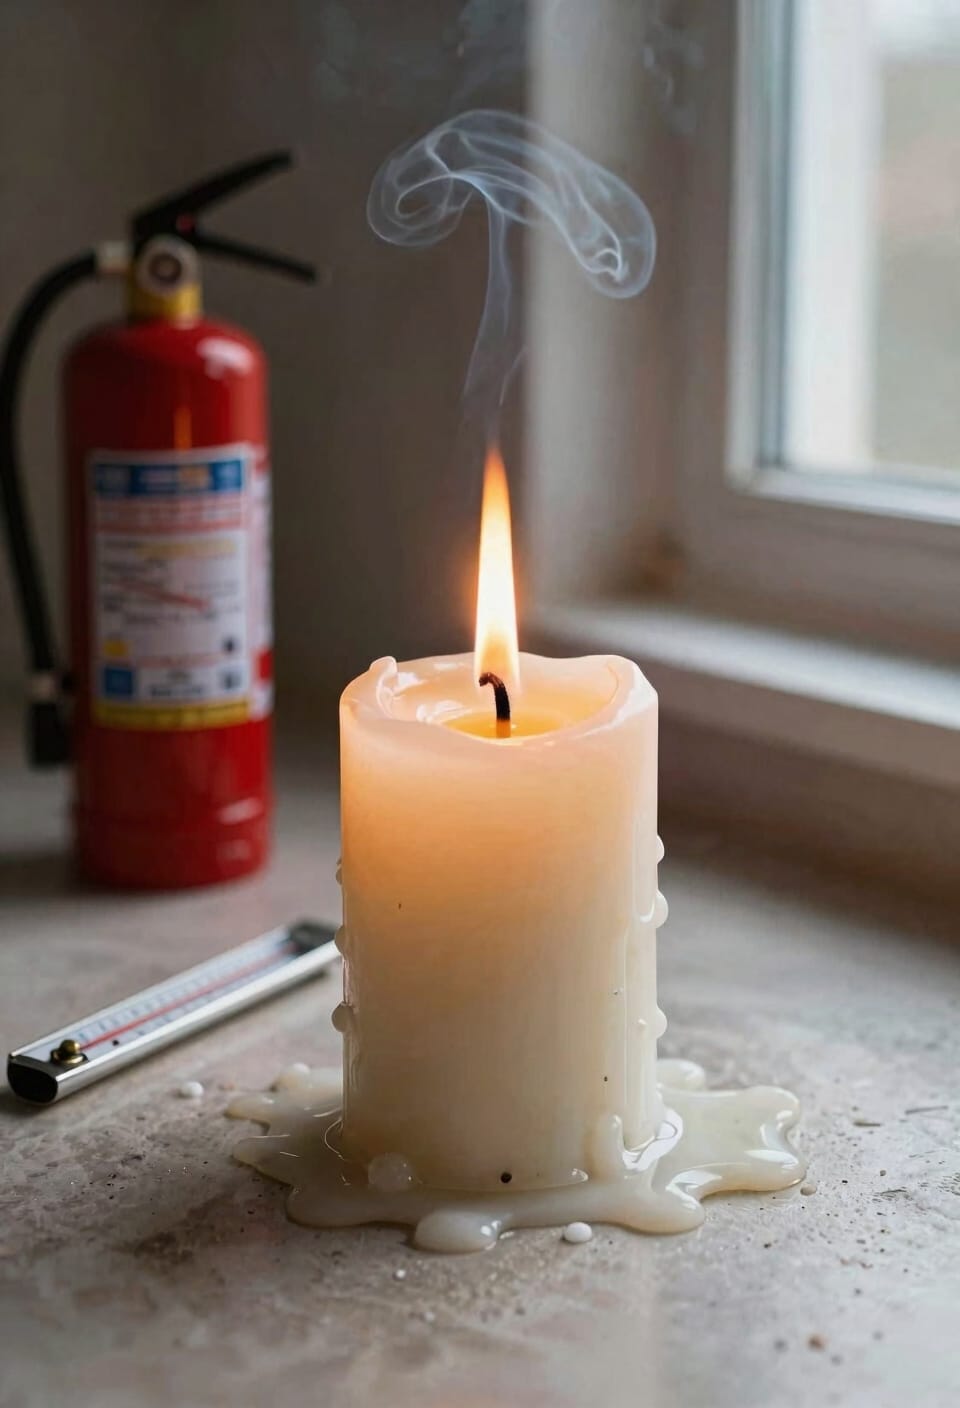
Confirming the Problem: The Burn Test Method
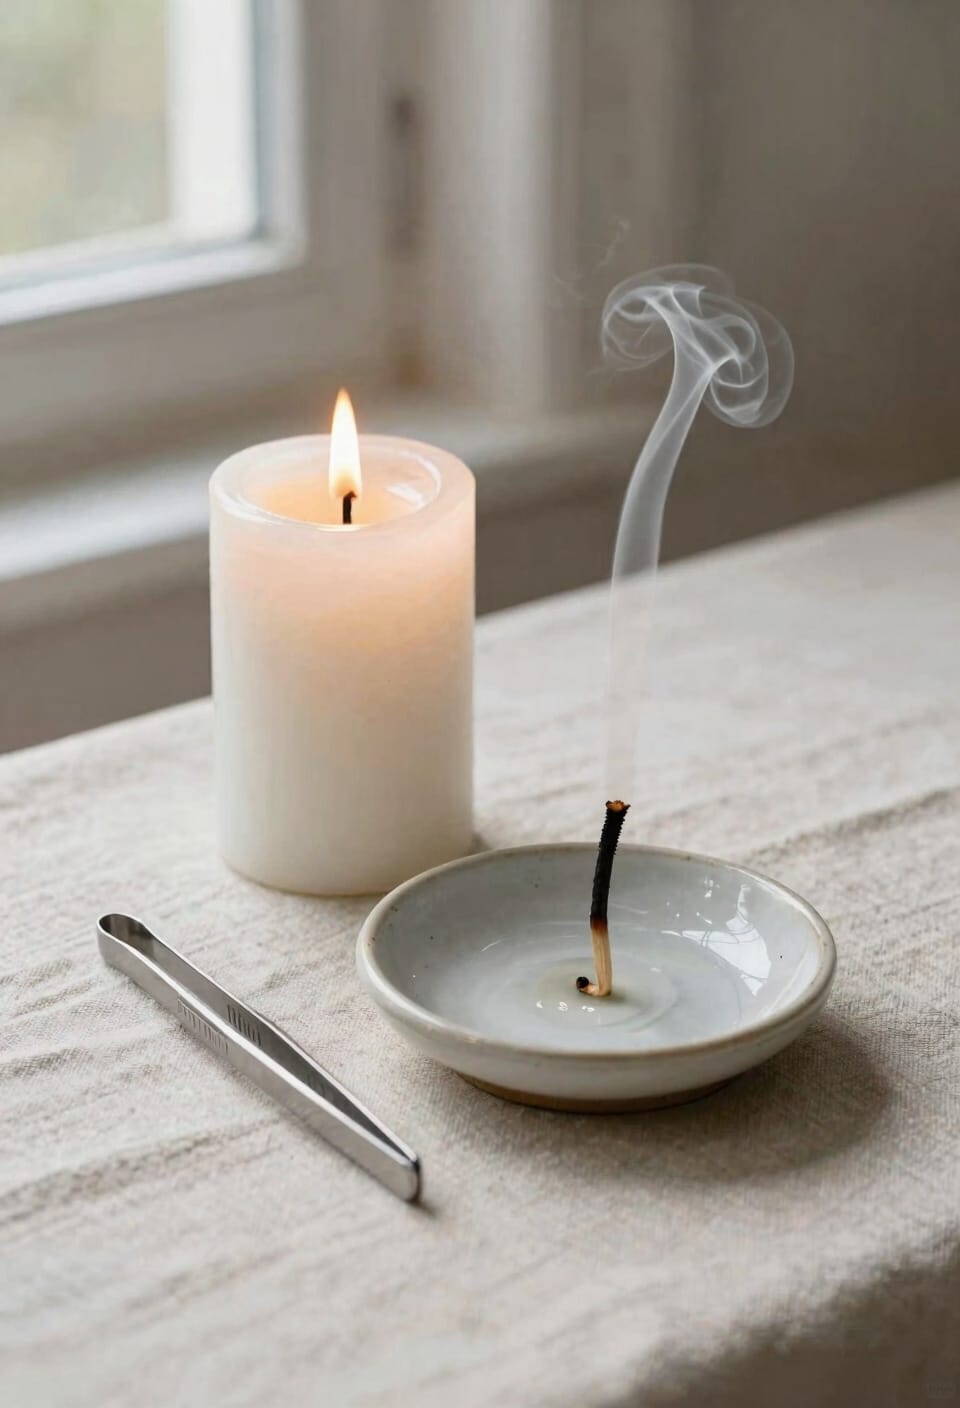
So you’ve spotted the red flags—the towering flame, the soot creeping up your walls, the wax disappearing faster than it should. Now here’s how to confirm what you’re dealing with: perform a proper burn test.
Light your candle and let it burn for two to three hours. Watch the burn pool depth—that’s the melted wax circle spreading from the wick—and observe how quickly it expands. A pool that’s too shallow or burns unevenly signals wick trouble. Pay attention to your trim frequency guide too. If you’re constantly trimming the wick and it keeps mushrooming, that’s your answer.
Notice the flame behavior, the smoke production, the container temperature. These observations don’t lie. They’ll tell you exactly what adjustments you need to make before this candle becomes a real problem in someone’s home.
Recommended Products

SIZE AND USE: 1L is the industry standard and best-selling size, good for dining room or living room, and should last 8-12 months. The active ingredients are water, perfume, denatured alcohol and many other elements. Perfect for gifts to friends and family. Diffusers disperse essential oils and can leave you feeling relaxed, lifted or energized throughout the day.

MASSIVE 8" × 8" LUXURY CANDLE –150 OZ OF NATURAL SOY WAX Make a statement with this Baby Big Ass Candle—our smaller of the two iconic oversized design. This luxury candle delivers bold presence, elegant style, and room-filling fragrance. Perfect as a centerpiece for living rooms, great rooms, and upscale spaces.

Country Of Origin: Germany
The Flickering Flame: What Causes It and Why It Matters
A flickering flame that won’t settle down—even when your room’s perfectly still and your AC isn’t running—is telling you something important about your wick size. Here’s the thing: when your wick’s too large, the flame dances unpredictably because combustion becomes unstable. You’re burning wax faster than the flame can control it, so you get that constant wavering motion instead of steady heat.
Now, this flickering matters because it’s directly tied to soot production and wasted wax. I’ve watched countless candles spiral into smoking messes because I ignored that telltale dancing flame. Wick trimming and flame stabilization go hand in hand—trim that wick down a quarter inch, retest, and you’ll likely see immediate improvement. That steady, calm flame you’re after? It’s your signal that combustion’s finally working right.
Black Smoke and Soot: Signs of Wick Mismatch
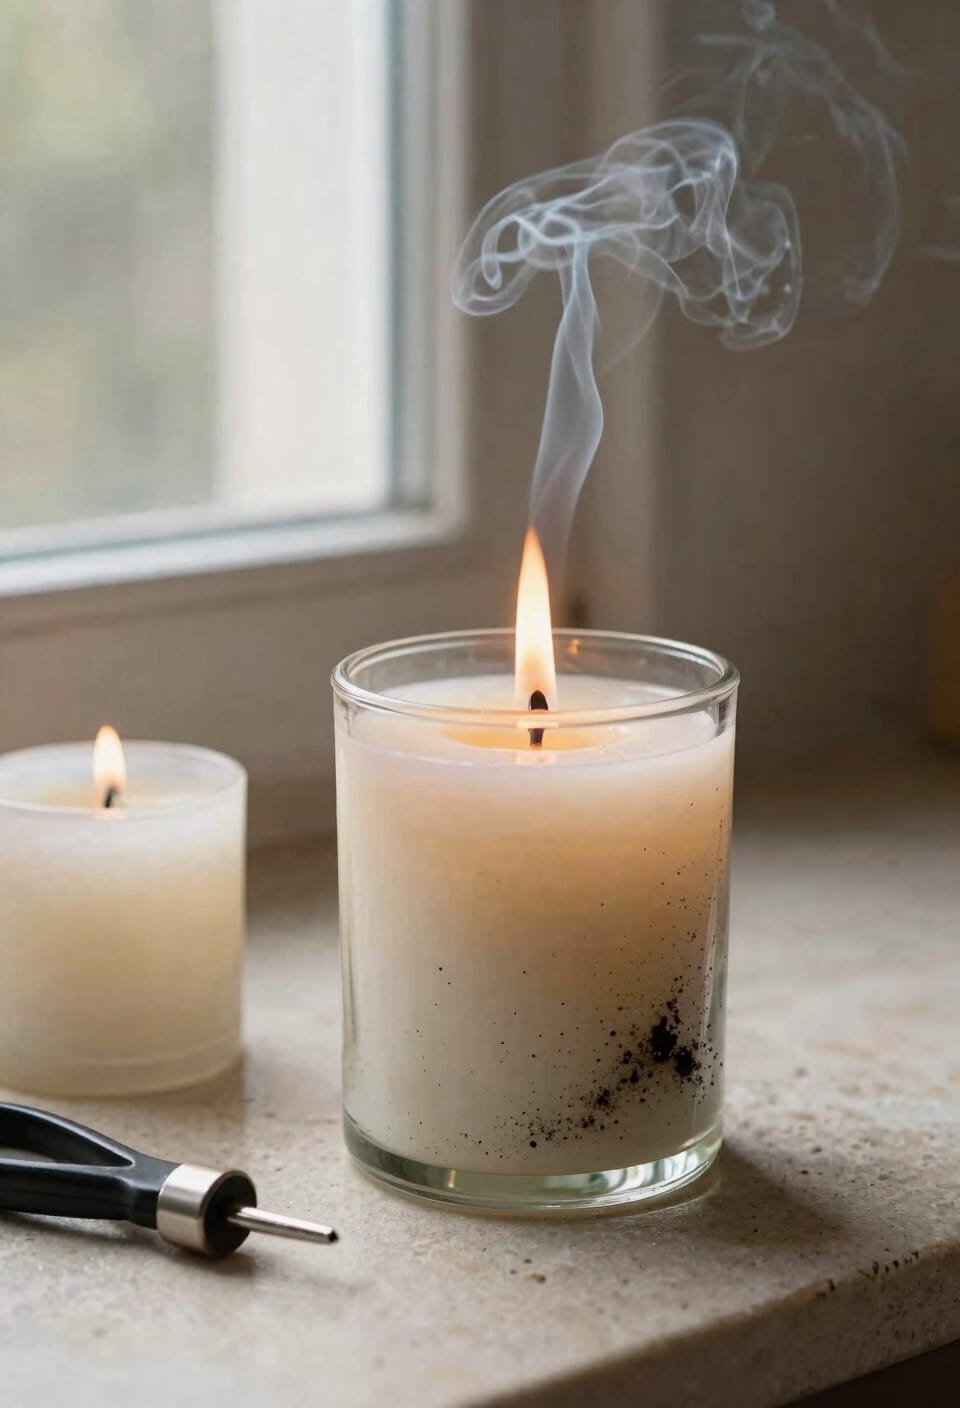
If you’re seeing black smoke curling up from your candle’s flame, that’s your wick screaming that it’s too large for the job. That dark plume isn’t just ugly—it’s incomplete combustion, meaning your soot composition includes unburned carbon particles that should’ve turned into heat and light. Here’s the thing: combustion chemistry requires the right balance between fuel (wax) and oxygen. An oversized wick burns too hot and too fast, outpacing what the wax can properly feed to the flame. The result? Black crusty buildup around your wick tip and discolored container walls. I’ve watched this happen countless times—beautiful soy candles turned into soot factories because nobody tested their wick sizing first. Trim down, test again, and you’ll fix it.
Recommended Products

Dimensions: 6.5 x 2.5 inches (17 x 6 cm)

EXTEND THE LIFE OF YOUR CANDLE: Wick trimmers are a must-have precision tool to properly care for your candle. Our stainless steel wick trimmers use a patented design that allows you to trim your wick and catch the debris with one snip.

Comes in individual boxes of two! Stainless Steel; Size: 6.77 x 2.44 Inch
Mushrooming Wicks: How Oversized Wicks Create Carbon Caps
When your wick gets too large for your candle’s diameter, it burns hotter and faster than the wax beneath it can keep up with, and that’s when you’ll start seeing what we call mushrooming—a dark, crusty carbon cap forming right at the wick tip like some tiny, unwanted toadstool. Those carbon caps happen because your wax is melting slower than the wick’s consuming it, leaving behind buildup. You’ll notice the mushroom darkens and thickens over successive burns. The fix is straightforward: regular wick trimming to about a quarter-inch prevents these caps from forming. I trim mine before each burn session. Neglecting this step means more soot, faster wax consumption, and a candle that won’t perform as intended.
Recommended Products

Pick Your Favorite Finish: No matter your interior design preference, we have a wick trimmer tailored for you. Choose from Black, Gold, Rose Gold, Silver, Brushed Gold, and Brushed Copper to complement your candles, decor, and gifting style

Perfectly trims wicks to maintain optimal candle burn

【10 Pcs Wick Trimmer Bulk】 With 10 gold candle wick trimmers included, this set is perfect for businesses, candle makers, or households with multiple candles. The bulk quantity ensures you always have a spare on hand, whether for different rooms and workshops. The consistent performance across all units makes them reliable for professional use, eliminating the need for frequent replacements.
Why Wax Burns Too Fast and Shortens Candle Life
The real culprit behind a candle that burns through its wax in half the time you’d expect comes down to that oversized wick we’ve been talking about—it’s simply consuming fuel faster than it should, and I learned this the hard way after my third batch of short-lived soy candles. When your wick’s too large, wick oxidation accelerates, meaning the fiber burns hotter and faster, pulling more melted wax into the flame than a properly-sized wick would. This aggressive fuel depletion dramatically shortens your candle’s life. You’ll watch your carefully measured wax pool disappear in weeks instead of months. That’s not just disappointing—it tanks your cost-per-burn and frustrates customers. Downsizing your wick fixes this immediately.
How to Right-Size Your Wick: Solutions and Prevention
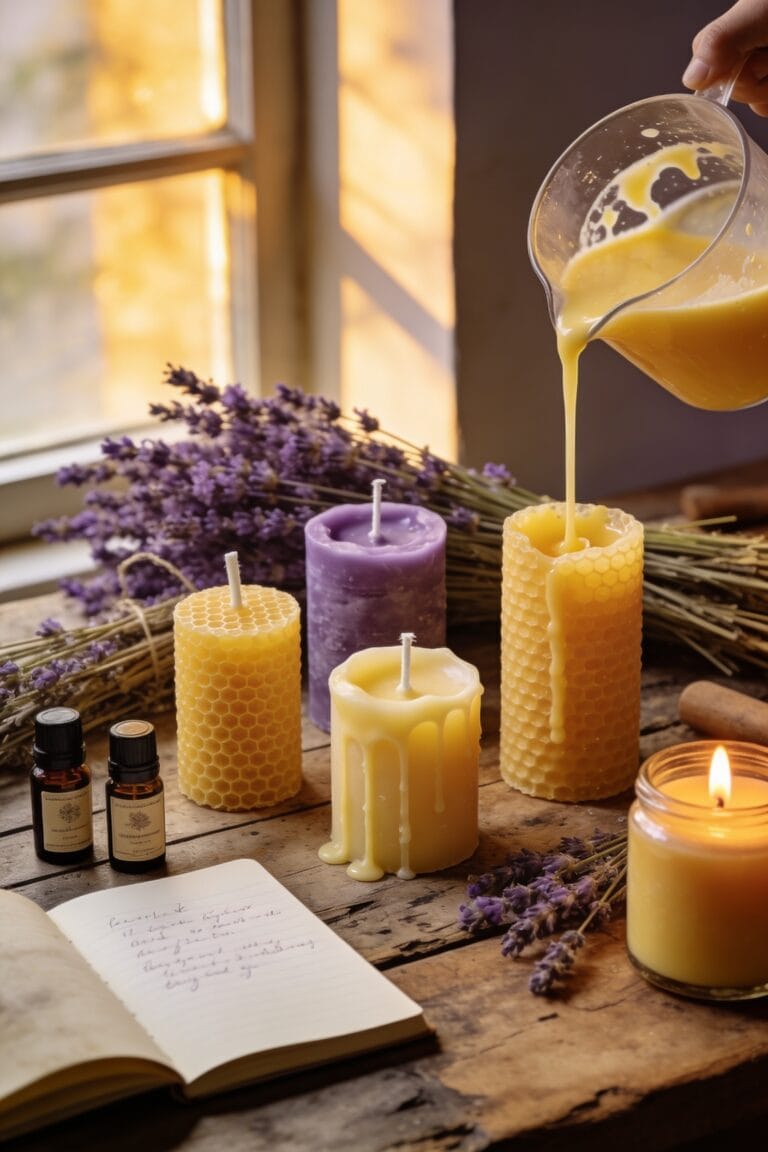
Now that you know an oversized wick is eating through your wax like it’s got somewhere to be, you’ve got to figure out what size actually belongs in your container—and honestly, this is where a lot of candle makers either get lazy or overthink it. Start by testing smaller fabric wicks. Burn each candidate for at least two hours, watching for that steady flame without flickering or mushrooming. Wick priming matters here too—let that wick absorb melted wax properly before your full burn test so you’re seeing true performance. Once you nail the right size, document it. Write down the wick type, diameter, and your container dimensions. This prevents repeating mistakes across batches and saves your sanity later.
Recommended Products
Wholesale candle jars - The package included 12 candle jars and 12 airtight bamboo lids. Ideal capacity - Wax weight (to fill line, test by soy wax 464) - 8 oz, volume(to overflow) - 10 fl. oz

100% ORGANIC HEMP & BEESWAX: 200ft of thick gauge (~2.0mm) natural beeswax coated hemp twine + 200pcs diameter 16mm wick hole 2.5mm neck height 7mm metal wick sustainer tabs candle making kit.

Elegant Candle Accessories Ki: The elegant 5 in 1 candle care kit Including a candlewick scissors, a candle snuffer, a candle wick dipper, electric candle lighter and candle tray, a gift velvet pouch, a box.
Frequently Asked Questions
Can I Fix a Mushrooming Wick, or Do I Need to Replace the Entire Candle?
You can fix a mushrooming wick by trimming it back to a quarter inch and curling the tip. I recommend regular wick maintenance throughout your candle’s life. You won’t need to replace the entire candle.
What Wax Type Works Best With Different Wick Sizes to Prevent Burning Issues?
Like matching shoes to terrain, I’ve found soy blends work best with smaller wicks, while gel candles handle larger ones better. I’d test both to prevent burning issues and guarantee peak performance.
How Long Should I Burn a Candle to Accurately Perform a Burn Test?
I’d recommend you burn your candle for at least two to four hours during the ideal duration needed for proper pool formation. This timeframe lets you accurately assess wick performance and wax behavior before making adjustments.
Are Wooden Wicks More Prone to Oversizing Problems Than Cotton or Hemp Wicks?
I’d say wooden wicks are actually more susceptible to oversizing issues. They’re thicker, burn faster, and risk creating excessive wooden char and spark risk when paired with larger candle diameters than cotton or hemp alternatives.
What’s the Ideal Container Temperature During Burning, and How Do I Measure It?
I’d recommend monitoring your candle’s surface temperature—I shouldn’t exceed 185°F. I use an infrared thermometer for ambient monitoring, checking the container’s exterior during burning to guarantee it’s comfortably warm, not hot.
Conclusion
Your wick’s size is the invisible hand steering your candle’s fate. An oversized one burns like a wildfire—gorgeous at first, then destructive. I’ve watched it happen: flame too tall, soot creeping up walls, wax vanishing in days. Getting it right? That’s when magic happens. Your candle burns clean, glows steady, and actually lasts. You’ve got this.